
R Model Operationalization on Azure - Part 1
This is part one of a multipart series. I’ll be going over different options for operationalizing R models on Azure with Azure Databricks, Azure Data Factory, Docker containers (which can be run on Azure Container Instances or Azure Kubernetes Service) and CI/CD pipelines with Azure DevOps.
The repo containing all the associated code for this series can be found at https://github.com/kcm117/azure-rmodel-devops.
The goal for this series is to walk through some elements of operationalizing an R model in Azure. While the exact steps may not work for every use case and team, I hope they can provide enough of a starting point for someone to tweak, alter and re-use to meet their needs. This series and associated code is not officially endorsed or supported by Microsoft in any capacity; it is published under the MIT license, as indicated in the repo here.
Prerequisites
This series assumes that you have an active Azure subscription with permission to deploy the following services:
- Azure DevOps
- Azure Databricks Workspace & Cluster (Cluster with Databricks Runtime version 5.2 at minimum)
- Azure Data Lake Gen2 (referred to as ADLS Gen2)
- Multi-protocol access preview is needed to automatically trigger ADF pipelines based on file creation. If it is not available for you, ADF pipelines can still be triggered by a schedule, manually or via debugging executions.
- Azure Data Factory (referred to as ADF)
- Azure Container Registry (referred to as ACR)
- Azure Kubernetes Service (referred to as AKS)
- Azure Key Vault
It also assumes that you are at least somewhat familiar with using the Azure portal and how to deploy Azure services.
We will also be using the following components/tools:
- R 3.4.4 https://cran.r-project.org/
- Plumber https://www.rplumber.io/
- Docker https://www.docker.com/products/docker-desktop
- Visual Studio Code https://code.visualstudio.com/
- Azure Storage Explorer https://azure.microsoft.com/en-us/features/storage-explorer/
- Azure Databricks CLI https://docs.azuredatabricks.net/user-guide/dev-tools/databricks-cli.html
Big Picture
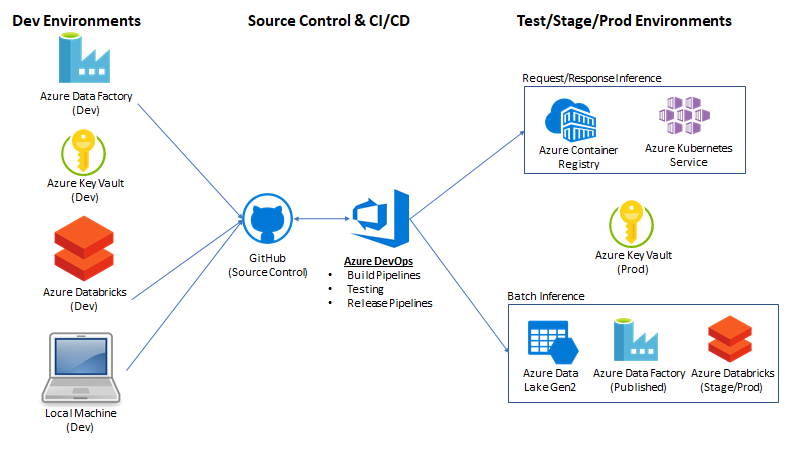
The main goal here is to show ways to operationalize an R model in a batch or request/response manner on Azure. We will develop the R model in an Azure Databricks notebook. After the model is trained, it will be serialized and saved to Azure Data Lake Store Gen2. We want a single trained model that can be deployed in two formats via CI/CD (Continuous Integration and Continuous Delivery) from a single git repository.
Batch processing: Once saved, a parameterized, scoring notebook can be created for batch processing. This notebook will take in two parameters: input file path & output file path. When executed, the notebook will load a specified file from the input path, perform scoring, and output results into a given destination. We will configure this process to be executed whenever a new file is landed in ADLS Gen2 via Azure Data Factory.
Request/Response: We will use the same model to create a web service, which will be deployed in a docker container. The service will take an HTTP request with a height parameter, and return a JSON response with a weight value.
Source Control: We will configure Azure Databricks and Azure Data Factory to utilize a Git repo for source control. Our downstream CI/CD processes will trigger based on pull requests and changes to the master branch.
CI/CD: We will use Azure DevOps to create build and release pipelines. For containers, the build process will create and store a new docker image in ACR based on repo changes, and the deployment pipeline will deploy stored docker images to a Kubernetes cluster environment. For Databricks notebooks, the build process will run the inference notebooks with associated unit tests as a Databricks job and deploy the inference notebooks to a production Databricks workspace, alongside an Azure Data Factory pipeline.
Azure Subscription & Azure DevOps requirements
You’ll need to deploy all of the resources mentioned in the prerequisites section of the post. Explaining how to deploy each resource is out of scope for this series. Please refer to the Azure documentation for each service for more information on how to deploy the services.
Deploying each service via the Azure portal is straight forward by just reading the prompts. I would recommend ensuring that all resources are in the same region. For this tutorial, I used the East US 2 region.
Key vault - You will want to create separate Azure key vaults to hold secrets for each environment. This will become apparent once we begin discussing CI/CD as we can scope different pipelines to different key vaults and reference secrets by the same name. For example, we can have a secret named “databricks-token” in each key vault that contains the access token for that environment. This will allow us to reference a single variable name in a script, but point to separate environments based on which environment we are targeting.
Azure Data Factory - I found it easier to create two separate data factories, one for dev and one for prod. When you create the production Data Factory, you can leave it blank. the CI/CD pipeline will handle deploying the linked services, pipelines, etc. to it.
Model Training in Databricks
The first thing we’ll need to do is create a simple R Model. This serious is focused on demonstrating an approach to operationalization, not to modeling. As a result, we will be using a simplistic linear regression model with fake data. The model will take in a single feature (height) and the predicted label will be the person’s weight. w1 = coefficient for height, x1 = height, y = weight, w0 = bias.
Weight = (w1 * Height) + w0
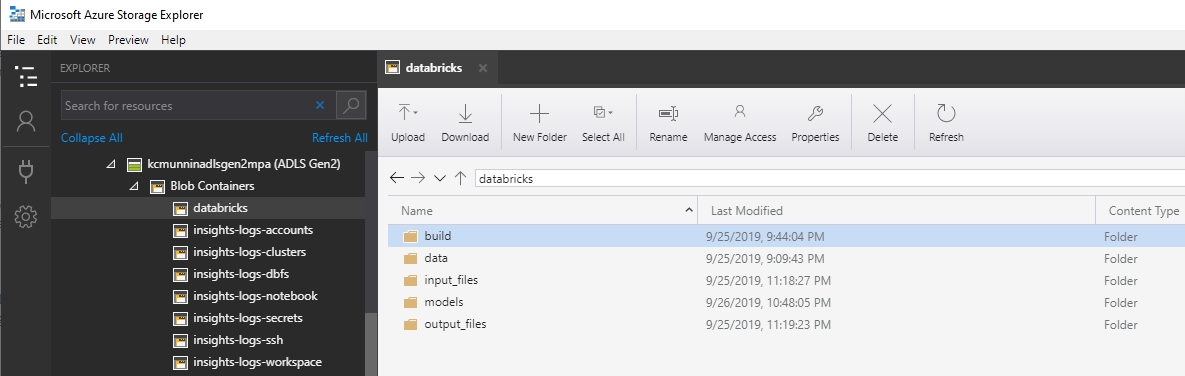
Alright, so how are we creating this model? First, let’s upload some sample data to ADLS gen2. We will create then use a file system within our ADLS Gen2 account called “databricks” which is mounted to the Azure Databricks workspace. Instructions on how to create an ADLS Gen2 account and mount it to a workspace is outside of the scope of this tutorial, but there are instructions in the Azure Databricks documentation here.
Our training data is located in the /data/train/weight_data. csv path from the repo. We will upload this file into data folder of our “databricks” file system on ADLS Gen2. This can be easily accomplished via drag and drop in the Azure Storage Explorer client.
After our training data is uploaded, we are ready to create the training notebook. This notebook can be imported into your Databricks workspace from databricks/train/r_train.r in the repo.
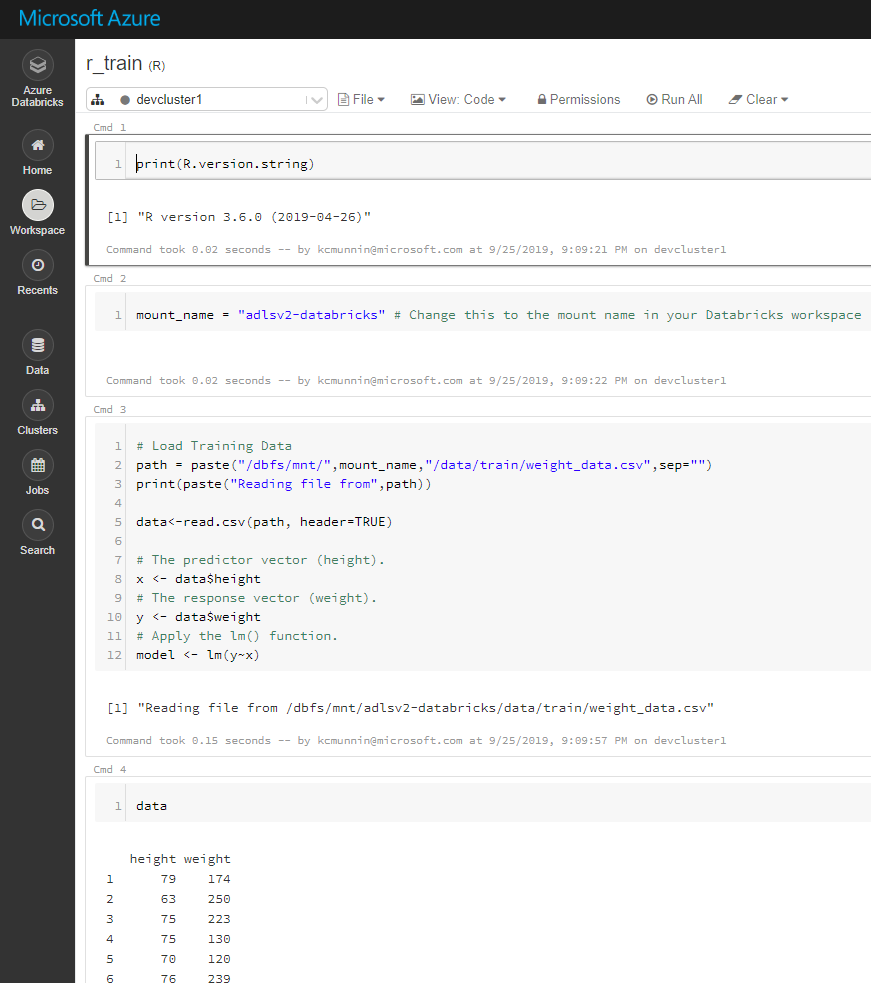
In Cell #2 of the Azure Databricks notebook, you will have to change the variable to whatever you called your Azure Databricks mount path for your ADLS account. In my case, the mount was named “adlsv2-databricks”.
Update 10/12/2020: At the time of original writing, pass-through authentication on ADLS was not GA. Your DBFS mount to ADLS Gen2 should be configured with a service principal. It does not appear that the R commands to read a csv will work with pass-through authentication at this time.
After changing the variable name, you should be able to run the notebook. It will save a serialized model file in /models/model.rds, relative to the root of your storage container.
Congratulations, at this point you have a trained and serialized linear regression model in R. In the next part of the series, we will create a parameterized notebook to score data with this trained model.
- Getting Started
- Part 1 - Prerequisites, Big Picture, Azure Subscription & Model Training
- Deployment Option 1 - Batch Processing
- Deployment Option 2 - Request/Response