
R Model Operationalization on Azure - Part 2
Welcome to Part 2! Parts 2- 5 of the series will cover Deployment Option 1, which is focused on batch processing flat files with Databricks and Azure Data Factory. We want to enable a scenario where our model can automatically perform inference on a flat file containing many records.
We left off in the previous post in a state where we have a training notebook in Azure Databricks, and a serialized linear regression model (model.rds) file in ADLS Gen2.
Inference Notebook
Now that we have a trained model, we need to create a way to perform inference (scoring) with that model. In many cases, it is logical to have a separate script (or notebook in this case) for inference. This allows us to better separate the task of training a model and scoring new data with it. At a high level, we need to create an inference notebook with the following characteristics:
- Input Parameters
- inputdata_path: Path of input flat file on ADLS Gen2 (file that will be uploaded by a system or user)
- outputdata_path: Path of output flat file on ADLS Gen2 (file that will include x values from user + predicted y values from model)
- Processing
- Load serialized model from ADLS Gen2.
- Perform prediction on new data
- Output
- Write flat file to ADLS Gen2 path specified by the outputdata_path: parameter.
The r_score_batch_databricks.r notebook does just this. You will notice there is also a commented out parameter for model inputs, in the case that you want to dynamically specify the path for the serialized model. In my sample, I have the serialized model in a static location of /models/model.rds on my ADLS Gen2 instance.
Make a note that the file paths in Databricks when referring to a mounted location must start with **/dbfs/mnt/
Inference Notebook - Tests
We now have an notebook for scoring. Now, we want to create some unit tests and model tests for this notebook. We will be using the testthat R library to create our tests, please refer to the libraries documentation for more information. Testthat is usually ran from the command line. Running this in a Databricks environment is not a straight forward process, as we don’t have direct access to a command line or shell interface and Databricks has a special process for executing other scripts from a notebook. As a result, we have to have a combination of multiple notebooks with parameters and R environment definitions to successfully run test cases, track them to a specific repo and build #, and output the test results to a standard test format file (such as a JUNIT formatted .xml file).
Please note that you will have to install the testthat library onto your Databricks cluster from CRAN (instructions).
Let’s take a look at the test directory in the repo and understand what files are there, with a quick explanation for each.
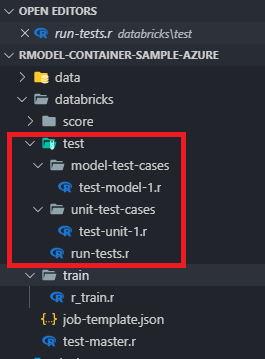
- /databricks/test-master.r - parameterized notebook to track repo name and build numbers for test runs
- /databricks/test/ - folder contains test artifacts
- run-tests.r - parameterized notebook which can execute test case directories and output results
- /model-test-cases/ - folder for model specific test cases, such as r-squared thresholds - test-model-1.r - contains actual test case functions
- /unit-test-cases/ - folder for unit testing, such as format, input, output - test-unit-1.r - contains actual test case functions
The basic flow from a testing perspective is:
- A Databricks job (or manual run) can run test-master.r. It defines a repo name, build number and location for test/train data that may be relevant to your test cases. This notebook executes a child notebook called run-tests.r with those parameters.
- run-tests.r is invoked with the parameters from the parent notebook. It loads the testthat library and defines all directories containing tests (/model-test-cases and /unit-test-cases in this scenario). It defines the format for the test results and path for the test results file. It then executes the test by running the tests in the defined directories and spitting out a results file.
You can look at the notebooks to see the sample tests. They are very simple for demonstration purposes, just a few data type/format checks and an arbitrary test for a known r-squared value. In the real world, these would be better tests! The testing directory flow may seem a little convoluted, this is because testthat is not really designed to run in the Databricks environment as previously mentioned, along with the fact that our CI/CD goal is to have fully reproducible and traceable results for a specific repo and build id, so it’s necessary.
Azure DevOps supports very specific test file formats (as noted here), so I chose JUnit as the format. The documentation for having testthat create a JUnit formatted test results file was unclear, but a colleague and I eventually figured it out. The key was to use a reporter parameter in the test_dir function which calls the unit tests:
# Run unit tests
test_dir(test_case_dir_unit, env=test_env, reporter = JunitReporter$new(file = test_output_file_unit))

# Run model tests
test_dir(test_case_dir_model, env=test_env, reporter = JunitReporter$new(file = test_output_file_model))
The testing components outlined above will enable us to have code test results nicely published in Azure DevOps and GitHub, with the ability to pass/fail builds in pipelines based on test results.
Final Thoughts - Inference Notebook
We now have a notebook to perform inference, and associated test scripts to test our inference notebook. Manually running our inference notebook in Databricks is fine for ad-hoc scoring, but we really want to be able to run this automatically, on-demand for files as they arrive in ADLS gen2. Achieving this goal with Azure Data Factory is what we will explore in Part 3!
- Getting Started
- Deployment Option 1 - Batch Processing
- Part 2 - Azure Databricks & Parameterized Notebooks for Inference
- Part 3 - Azure Data Factory Pipelines
- Part 4 - CI for Databricks
- Part 5 - CD for Databricks and ADF
- Deployment Option 2 - Request/Response