
R Model Operationalization on Azure - Part 4
Welcome to part four of the R Model Operationalization on Azure series. In this section, we will focus on creating the CI (continuous integration) portion of the batch pipeline with Azure Databricks inside of Azure DevOps.
The first thing you’ll need to do is head to https://dev.azure.com/ and get signed up for the service. There is a free tier available with some limitations.
Here is a high level picture of what we’re looking to accomplish with CI/CD for operationalizing batch scoring with Azure Databricks and Azure Data Factory. We will be focused on the “ci-rmodel-databricks” section which represents the build process for our Azure Databricks notebooks and associated artifacts.
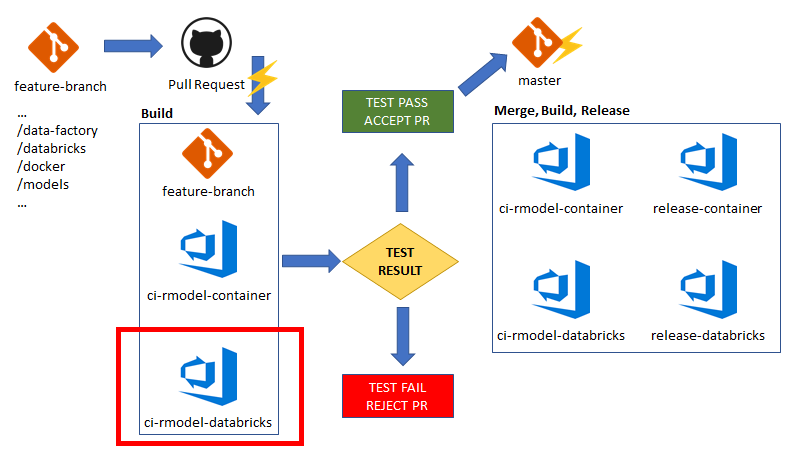
The flow of events here is:
- Feature branch is created off of master, some change is made to the /databricks or /models directory within our repo. This means we updated/changed some Databricks notebooks related to training, inference or the actual serialized model file.
- A pull request is made against the master branch, which triggers a build process in Azure DevOps.
- Continuous Integration: The ci_rmodel-databricks build pipeline runs for the feature branch. This pipeline contains the tasks we want to execute in order to validate code and determine pass/fail for progression to a higher environment. Test results are captured and we achieve traceability to the exact code changes requesting promotion to test, stage or production environments.
- If the build process fails, that information is associated with the pull request, where an approver will most likely reject or delay acceptance of the pull request.
- If the build process succeeds, that information is associated with the pull request, where an approver has the ability to accept the merge to the master branch.
- If the pull request is accepted, the feature branch is merged to the master branch, which triggers a subsequent builds and releases based on pipelines defined in Azure DevOps.
Azure Devops Configuration
You’ll need to perform some initial configurations in you Azure DevOps environment to get it set up like the following picture:
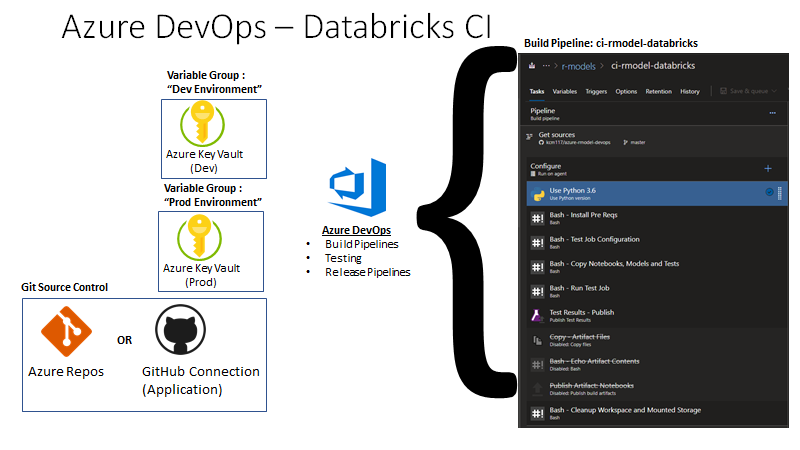
- Connect your Azure Key Vault resources as variable groups and add secrets to Key Vault (instructions).
- In this example, we create “Dev Environment” and “Prod Environment” variable groups which each correspond to their respective Azure Key Vault instances.
- Connect GitHub to your Azure DevOps project, if you are using GitHub instead of Azure Repos (instructions).
- If you’re using GitHub, I would recommend using the application integration instead of OAuth so that test results are displayed alongside GitHub pull requests.
- We’ll be using variables and triggers in Azure DevOps throughout the series. I would recommend reading the following links to get an understanding of variables, pre-defined variables and triggers in Azure DevOps.
- Variables - https://docs.microsoft.com/en-us/azure/devops/pipelines/process/variables?view=azure-devops&tabs=classic%2Cbatch
- Pre Defined Variables - https://docs.microsoft.com/en-us/azure/devops/pipelines/build/variables?view=azure-devops&tabs=classic
- Triggers - https://docs.microsoft.com/en-us/azure/devops/pipelines/build/triggers?view=azure-devops&tabs=classic
Build Process
Now that the Azure DevOps environment has access to our Key Vaults and we have an understanding of variables in Azure DevOps, we can begin to design our build pipeline for the Databricks notebooks. We’ll lay out the following goals for our pipeline:
- We want the notebooks in our repo deployed to a “build” environment in Databricks, where the notebooks can be executed and tested.
- We want the ability to trace which repo and build produced which notebooks and track the execution of each build within the Databricks environment.
- We want to view each build run as a job execution with Azure Databricks, so we can easily debug from within the Databricks UI.
- We need to extract the unit/model testing results from the testthat R library and bring them into Azure DevOps, so we can view test pass/fail in the build history, and pass/fail the build accordingly.
For this build, I will point out a few caveats in the implementation:
- When first built, there were no native Databricks tasks in Azure DevOps. There are now tasks published by Microsoft DevLabs. I’ve not tested these tasks personally, but I’ll assume they are wrapping the Databricks CLI or REST API. In this implementation, I’ve used the Databricks CLI via bash scripts running on the agent to interact with the Databricks environment.
- I have the scripts for the bash tasks inline instead of in the repo itself. This was due to constant debugging and tweaking, it was easier and faster to edit inline than constantly commit/push.
- The Azure Machine Learning service was not used to store the serialized models and for other features such as experiment/hyperparameter tracking, etc. This was because there was no Azure ML R SDK available at the time. However, the R SDK is not being actively developed, so that would be something I could include in future attempts.
Since the steps can be imported, I will not walk through every line of code but attempt to point out the overall flow of the tasks and areas that may seem confusing.
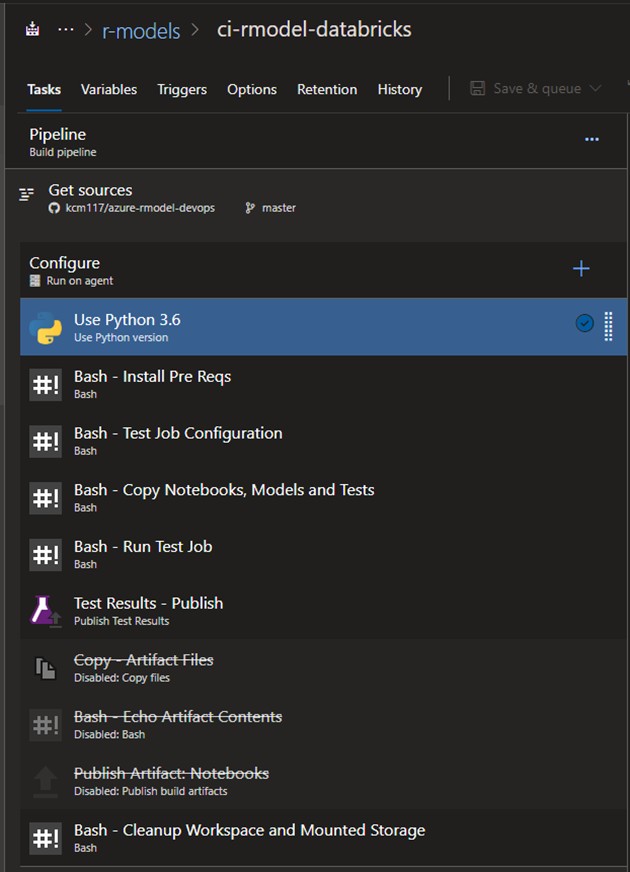
Build Config
You can import the Databricks into Azure DevOps build pipeline from the /devops directory within the repo. This pipeline is built assuming that there is a static cluster, always running in the development environment with a known Databricks cluster id. This cluster ID is specified as a Pipeline Variable called DATABRICKS_CLUSTERID, which had a value of 0924-164345-sofa329 in my case. For this pipeline, the only real variable needed from the Azure Key Vault is the Databricks-token variable.
Be sure to set the “Get Sources” step to your own repo and use an Ubuntu build agent. In my case, I used a Hosted Ubuntu 1604 agent.
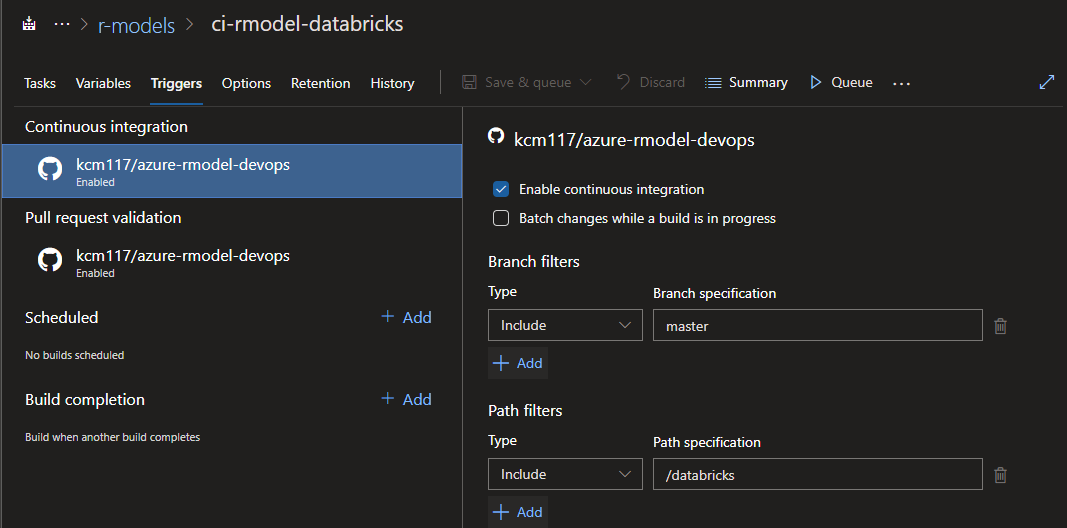
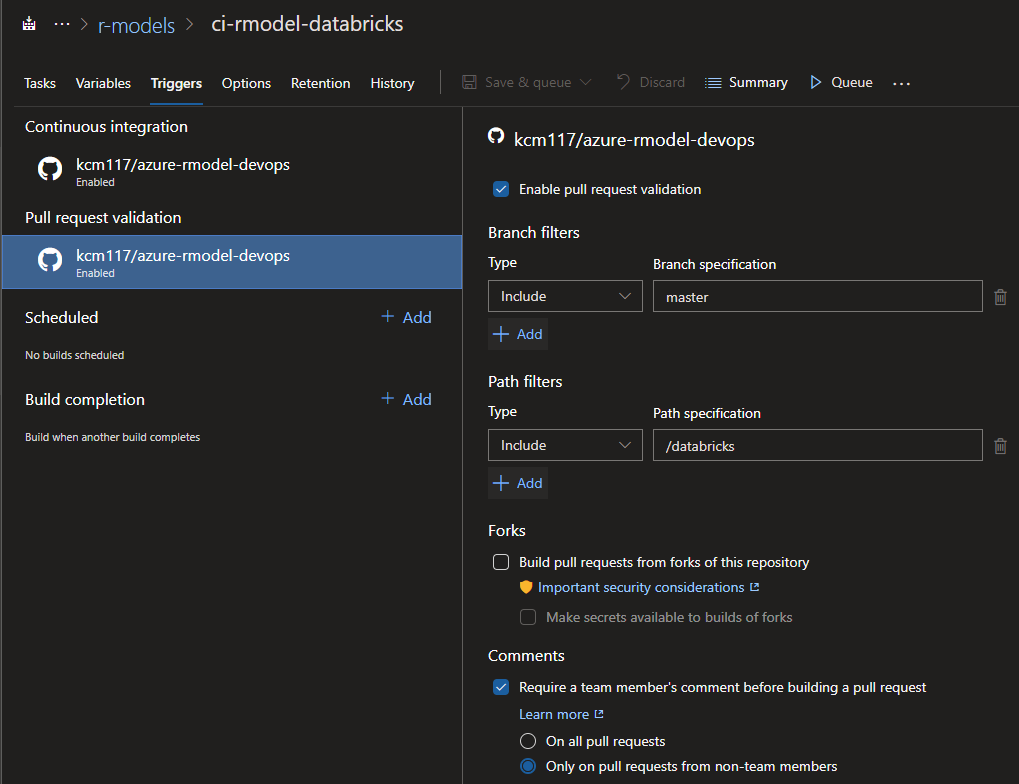
I also set the build with Continuous integration triggers for the master branch, with a path filter on /databricks so this build only updates when there are changes to Databricks code. Remember, we also have a container based deployment coming up for this model in later sections, and we would not want a Databricks build to kick off when we’re messing with docker code that has nothing to do with Databricks.
For triggers, we also have pull request validation turned on so that builds are performed when a PR against master branch is submitted.
Python and prerequisites
The first two steps are fairly straightforward. I want to specify that the build agent uses Python 3.6 for the Databricks CLI, and install some dependencies such as the Databricks CLI itself, and jq for parsing JSON returned by the CLI.
# KC Munnings, 2019
# Sample Code.  Not for production use.

# Install pre-reqs such as Databricks CLI, JQ, etc.
sudo apt-get install build-essential -y
sudo pip3 install --upgrade pip
sudo pip3 install --upgrade pip setuptools wheel
sudo pip3 install databricks-cli
sudo apt-get install jq
Job Configuration
This step is basically performing a find/replace on the Databricks Job template defined in /databricks/job-template.json. It replaces the cluster id with the value defined in our pipeline variable, and makes the job name match the name of the repo with the prefix of “build-“. The thought is that you would easily be able to go to the Databricks Job UI in your build workspace and quickly navigate to builds for a specific repository very easily.
Within the Databricks workspace, I have all builds being performed in the /Shared/build directory, where every repo has a subdirectory under that containing the parameterized test execution notebook, with another subdirectory for every unique build id from Azure DevOps. With this kind of structure, you could quickly navigate to an exact build for a repo and see the notebooks which were tested.
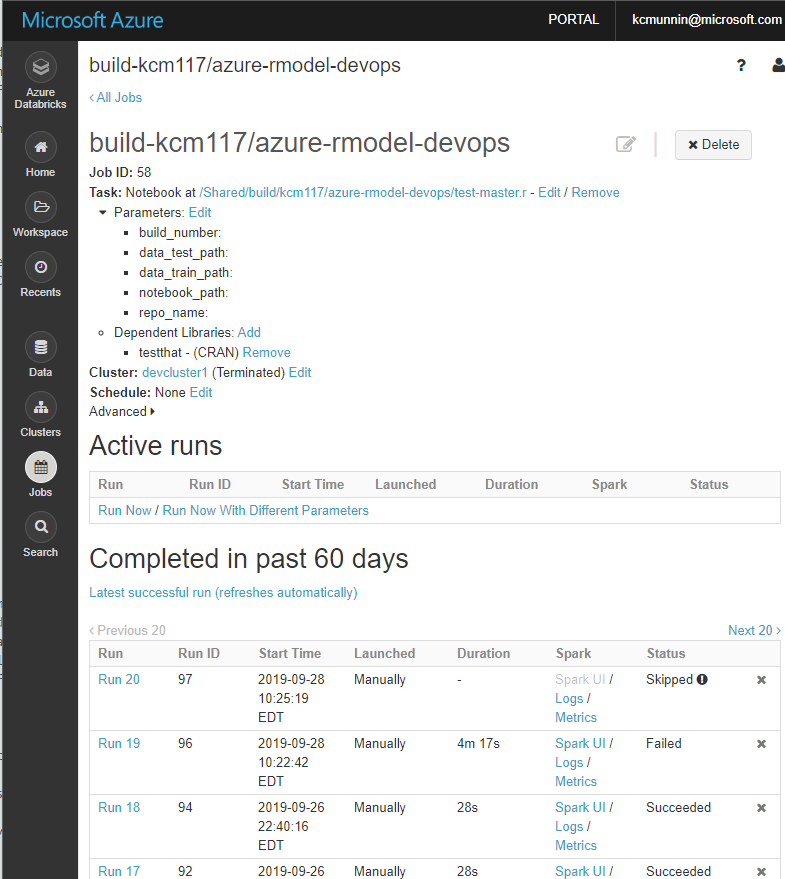
This step in the pipeline will create the job in Databricks if it is not yet created for that repo. This is what the job will look like in Databricks once created, a single parameterized job with a separate run for every build:
Copy Files
- The next step is needed to move the files from the repository into the Databricks workspace and into ADLS Gen2. It copies everything from the /databricks directory into the repo into the Databricks workspace (subject to file extension limitations on Databricks imports). The target directory is identified as /Shared/build/REPO_NAME/BUILD_ID/ where REPO_NAME is the name of the linked git repository, and BUILD_ID is a unique build id for that execution of the build pipeline.
- Because of the way testthat sources test files and test file directories from the “local” file API, we need to also copy test scripts/notebooks to ADLS Gen2, so they can be sourced by testthat via our ADLS Gen2 file system mount in Databricks.
- The serialized model.rds file also needs to be copied to ADLS Gen2 storage, as it cannot be loaded from the workspace.
- A small subset of test data is also copied to ADLS Gen2, as our test scripts require data as a part of our tests.
Run Test Job
No that the job is configured and all relevant notebooks, models, test data etc. have been copied, we can run an instance of the job to perform our build. This task defined all the parameters needed for the job (as shown in the Databricks screenshot above) such as build_number, repo_name, notebook_path, data_test_path, and data_train_path.
I have a TIMEOUT bash variable configured with a default value of 60 seconds, since I know these notebooks execute very quickly. If your cluster is not started or your job takes much longer, you may have to greatly increase this value. In the bash script, we have to submit the job for execution and then poll it at a given interval to get the status. Once the job has terminated with success or failure, we can proceed. One action item I never got around to since this was for a demo and not a real production system was to add logic in the “FAILED” result block to raise an error, then configure the task to fail on error. However, if the job is successful, we copy the test result .xml files from ADLS Gen2 storage onto the build agent, so we can view the test results in the Azure DevOps build history UI.
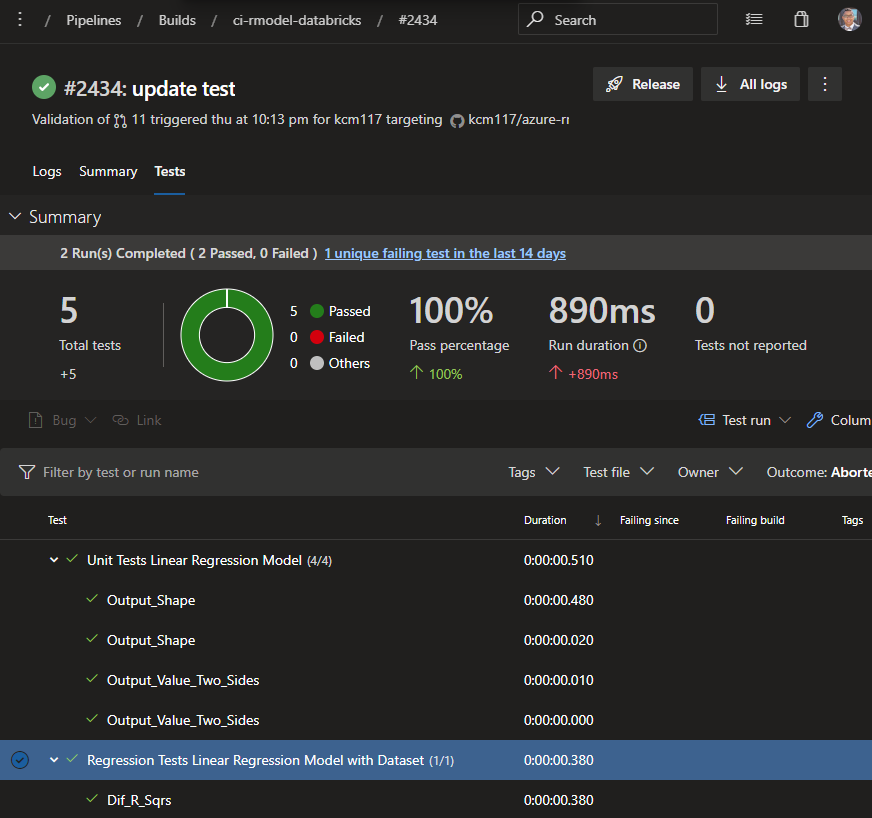
Publish Test Results
Since we copied the JUnit formatted .xml files containing the test results onto the build agent, we can now publish them to the build history. Once published, they show up in the build history like this:
Artifact Activities
You will notice there are three activities related to artifacts which are disabled. I first attempted to produce artifacts from my build as a handoff to my release pipelines. I only wanted artifacts produced when the build was running on the master branch. After more testing, I decided to abandon that route in favor of having the Pull Request to master act as a quality gate, and for the releases to just reference the master branch and trigger only on successful build pipelines that were performed on the master branch. If you prefer to use artifacts instead, that is a reasonable route to pursue.
With the process as-is, when a PR is performed against master, the build is triggered, and pass/fail results are displayed in Azure DevOps and GitHub. If the PR approver accepts the merge based on successful test results, then the build runs again on the master branch which will then kick off a release upon success.
Cleanup
This step deletes the notebooks for that build from the Databricks workspace, along with deleting all the build artifacts from ADLS Gen2 storage. This can be disabled if you want all artifacts easily accessible for all previous builds, but it can lead to having hundreds/thousands of directories and files in your workspace and ADLS Gen2 storage. I would suggest while debugging to disable this step and explore the files created in the Databricks workspace and ADLS Gen2 as a result of the build process. If I were doing this in the real world, I would probably choose to keep the last two weeks or month of builds and have a cleanup process delete directories older than that, depending on how many builds were being performed.
Wrap Up
Well, this was a long section! By this point, we now have a source control and continuous integration process with testing for our R inference notebooks in Azure Databricks. In the next section, we will tackle creating a release pipeline for the Azure Databricks notebook and associated Azure Data Factory job so it can be ran automatically based on file arrival.
- Getting Started
- Deployment Option 1 - Batch Processing
- Deployment Option 2 - Request/Response