
R Model Operationalization on Azure - Part 5
We’ve made it to part five of the series! Now, we’re going to focus on the release pipeline for batch inference, which involves deploying Azure Databricks & Data Factory resources. In the previous section, we completed the continuous integration portion of our CI/CD pipeline.
Release Pipeline Overview
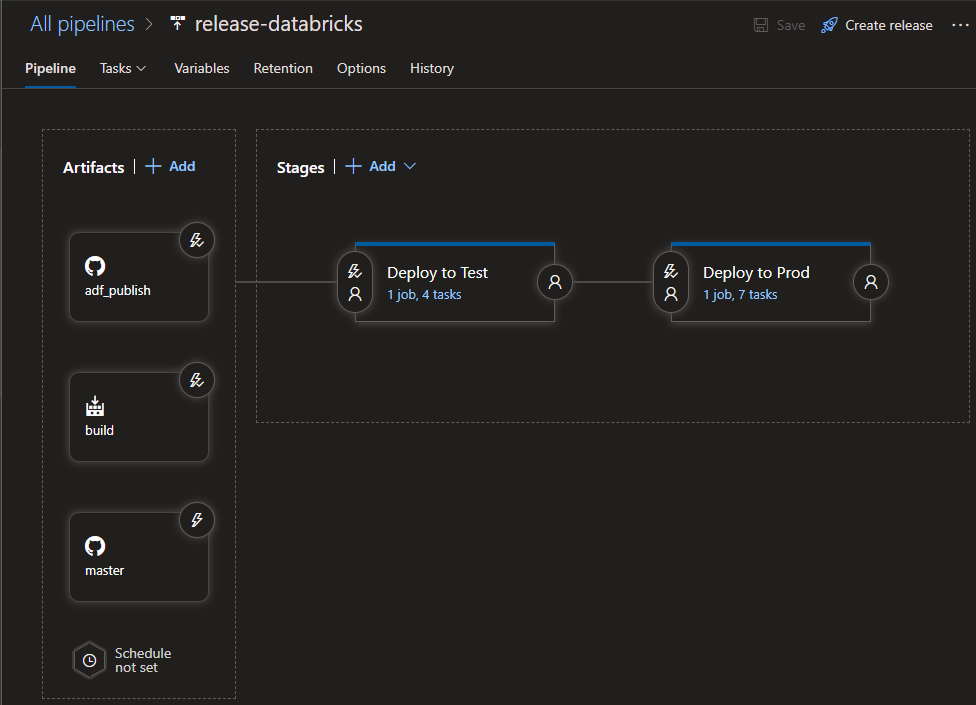
For this pipeline, we reference three artifacts: the adf_publish branch, the master branch and the build pipeline from Part 4. There are release triggers enabled on the adf_publish branch artifact and the build artifact. After the artifact references, there are two stages, one to deploy to a test environment, and one to deploy to a production environment.
In this example, the “test” environment is the same Databricks workspace as the “dev” environment, but only the scoring notebook is deployed to the /Shared/azure-rmodel-devops directory, since that is the only notebook needed to test the use case. The actual training of the model is irrelevant as far as deployment to the test environment is concerned (along with it’s associated training notebooks). All that is needed for the higher environments are the inference notebook and serialized model. We have the same ADLS Gen2 location (/databricks/models/model.rds) for the serialized model.rds file utilized by all environments in this example. In the real world however, you’ll probably have separate ADLS Gen2 file systems or possibly even separate ADLS Gen2 resources for separate environments. In the example I use separate directories in the development workspace to simulate separate dev and test environments. So, for clarification, we have the following Databricks workspaces and directories for Databricks notebooks in this example.
- Dev Environment (Interactive Dev by Data Scientist, frequent code changes):
- Workspace: kmdatabricksdev
- Cluster ID: 0924-164345-sofa329
- Workspace Directory: /Users/USER_NAME/REPO_NAME/*
- Workspace Directory Contents: All the notebooks created by the Data Scientist.
- Build Environment (Only used by the build process)
- Workspace: kmdatabricksdev
- Cluster ID: 0924-164345-sofa329
- Workspace Directory: /Shared/build/REPO_NAME/BUILD_NUMBER/* - You could lock this directory down so that non-admin users cannot modify or see the directory. it is only meant to be utilized by the build process and for debugging or auditing purposes.
- Workspace Directory Contents: All the notebooks created by the Data Scientist that require promotion to higher environments, with tests
- Test Environment (To be used for QA/ UAT)
- Workspace: kmdatabricksdev
- Cluster ID: 0924-164345-sofa329
- Workspace Directory: /Shared/REPO_NAME/*
- Workspace Directory Contents: Just the inference notebook.
- Prod Environment
- Workspace: kmdatabricksprod
- Cluster ID: 0924-164644-peals443
- Workspace Directory: /Shared/REPO_NAME/*
- Workspace Directory Contents: Just the inference notebook.
Release Configuration
In our release configuration, we will need to configure a few variables, along with variable groups which correspond to our Azure Key Vault resources for dev and prod.
Pipeline Variables

We need to set a databricks-clusterid variable for our test and production environment. In this pipeline, we can make two variables with the exact same name, but set to different scopes. This will allow us to re-use tasks that reference the databricks-clusterid variable in our test and production deployment stages, but they will have different values at runtime. We have to do this because different clusters in separate Databricks workspaces will have different cluster ids.
We also set a DataFactoryName variable so we can override the name of the production data factory we will be deploying to from our dev template.
Variable Groups
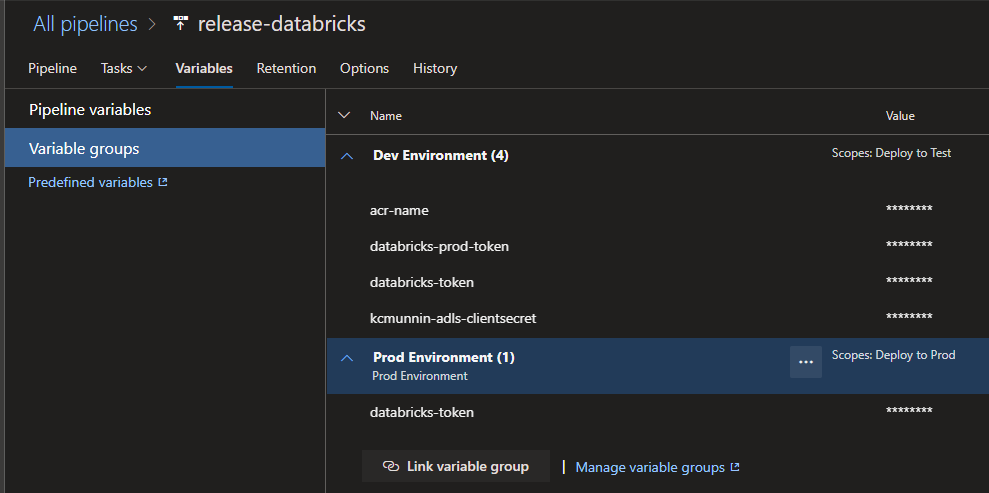
We have two separate variable groups here that each correspond to our development and prod environment key vaults. The “Dev Environment” variable group corresponds to…you guessed it, the dev Key Vault instance we set up. The same logic applies to the “Prod Environment” variable group. You may notice I have a few extra variables up there, that’s because they refer to secrets that exist in the key vault. I stored my ADLS Gen2 service principal client key in the same vault for mounting the file system to the workspace, and the Azure Container registry name is there for the container deployments for the Request/Response deployment pattern that we’ll cover in parts 6 through 9.
You will want to make sure that each key vault scope is configured to the appropriate Stage in the release.
Artifact References
As stated previously, we have three artifact references in the pipeline:
- Git Repo Branches:
- adf_publish
- master
- Build Pipeline:
- ci-rmodel-databricks
repo - adf_publish branch
We will need to reference the adf_publish branch from our repo because that is the branch which Azure Data Factory publishes ARM templates to after you click the “Publish” button in the ADF Web GUI, for a Git Enabled data factory. This branch is managed by Azure Data Factory and you don’t normally have to worry about manually interacting with it. I’ve enabled a continuous deployment trigger with a Branch Filter set to include the adf_publish branch, so that new publications from ADF will trigger a release.
repo - master branch
We need a reference to the master branch because we want to grab files (namely the inference/scoring notebook) from the master branch, which were approved by a pull request into the release.
build
We have an artifact referencing our ci-rmodel-databricks with the alias “build”. In this case, we’re not actually grabbing any artifacts from builds, but we want to enable a CI trigger on this artifact with a build branch set to include the master branch. This will configure the release to automatically trigger whenever there is a new build on the master branch. Recall that in this example, builds of the ci-rmodel-databricks build pipeline only occur after a manual approval of a merge request from a feature branch to the master branch after all tests have passed.
Stage - Test Deployment
These testing steps should look familiar:
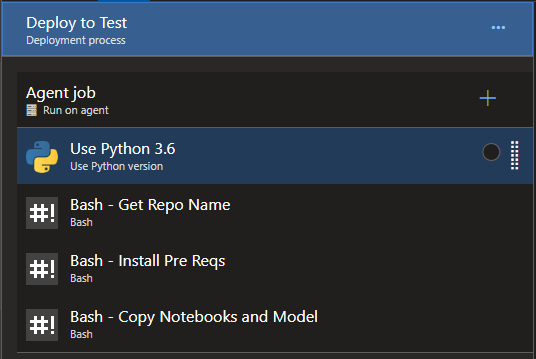
They are the same exact steps from the build process. Basically, we need to again :
- Extract the name of the repository so that we can parameterize the target location in the Databricks workspace where we plan to copy the notebook to.
- Ensure the Databricks CLI is installed
- Use the Databricks CLI to copy files from the repository to the Databricks test environment.
The difference here is that this stage which deploys to test will reference the databricks-clusterid variable from our manually specified variable which is scoped to this stage, which has the proper Databricks cluster id for the environment. This stage will also reference the dev environment Key Vault, which has the Databricks token corresponding to our dev Databricks workspace.
Once the inference notebook is successfully copied to the workspace, we’re done with our “test” Databricks deployment!
Stage - Deploy to Prod
Now we’re at the production deployment step. I don’t have any manual approval gates, email notifications or other steps that you should probably consider in a real world production deployment. Steps 1 - 4 are exactly the same, but this stage will utilize the production databricks-clusterid variable and the production databricks-token variable due to the fact that we scoped those variables and variable groups to this stage.
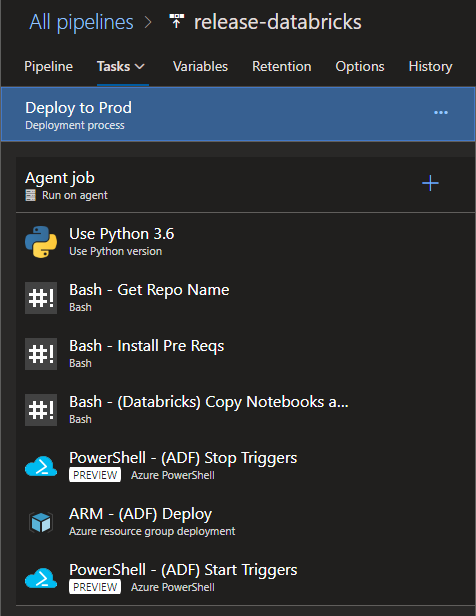
The items I do want to highlight are steps 5 through 7. You should read the Azure Data Factory CI/CD best practices here for information as to why you should stop ADF triggers before an ARM deployment, then restart them after. These actions can be accomplished by very simple Azure PowerShell scripts which are in the repository and documentation.
For step 6, the main thing you want to focus on is ensuring that you have your ARM deployment step configured properly, this is where the adf_publish branch artifact we have is used. You’ll need to reference the ARMTemplateForFactory.json file from your directory for the Template setting and reference the ARMTemplateParametersForFactory.json file from your directory for the Template parameters setting. Azure DevOps will pull in parameters from the .json templates, and allow you to override them at runtime.
Remember this lovely screenshot (below) from Part 3? This is where the parameterization magic happens:
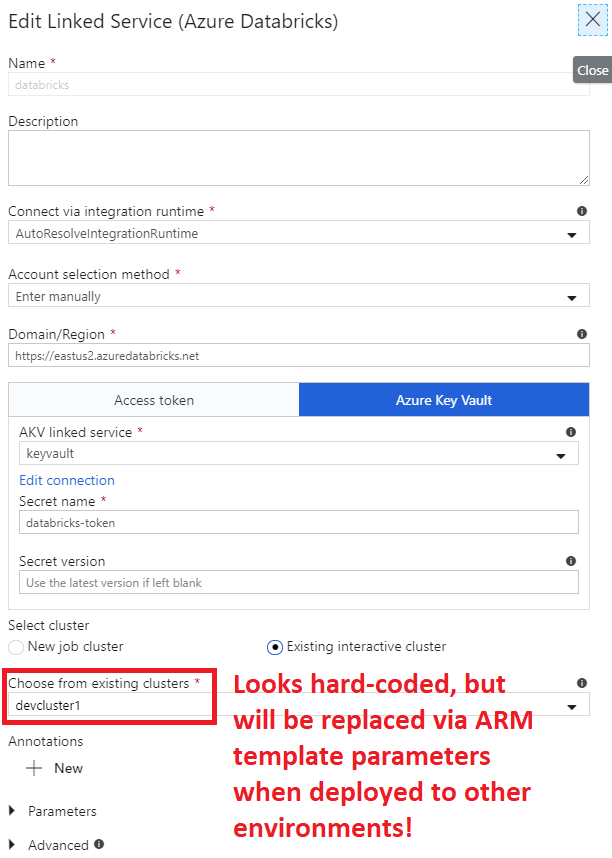
When you specify ”$(databricks-clusterid)” (yes, with the quotes) as the Value for the databricks_properties_typeProperties_existingClusterId parameter in the ARM template, it will make the ADF deployment in your production environment reference the proper Databricks cluster id that actually exists in your production Databricks workspace, pretty snazzy. If you’ve read the ADF documentation about CI/CD, you’ll most likely reach the conclusion that you want to use the Incremental deployment mode for your ARM template deployment so that you don’t delete everything that’s not defined in the current ARM template from your target production resource group.
- Getting Started
- Deployment Option 1 - Batch Processing
- Part 2 - Azure Databricks & Parameterized Notebooks for Inference
- Part 3 - Azure Data Factory Pipelines
- Part 4 - CI for Databricks
- Part 5 - CD for Databricks and ADF
- Deployment Option 2 - Request/Response