
R Model Operationalization on Azure - Part 6
Welcome to Part 6. Parts 6 through 9 of the series will focus on creating inference scripts for our model, executing them as web services, creating a container + Kubernetes service and the associated CI/CD for the second deployment option. Our goal here is to have a request/response web service deployed for performing inference with the same R model we used from the Databricks/ Batch inference portion of the series.
Overview - Deployment Option 2: Request/Response
The diagram below shows the basic flow of what we need to support a containerized R model as a part of a CI/CD process. For Part 6 of the series, we will focus on how we expose an inference script as a request/response web service in R, along with associated testing for the inference scripts. Part 7 will focus on what’s needed to containerize that request/response web service and then parts 8 and 9 will focus on the CI/CD pipeline in Azure DevOps.
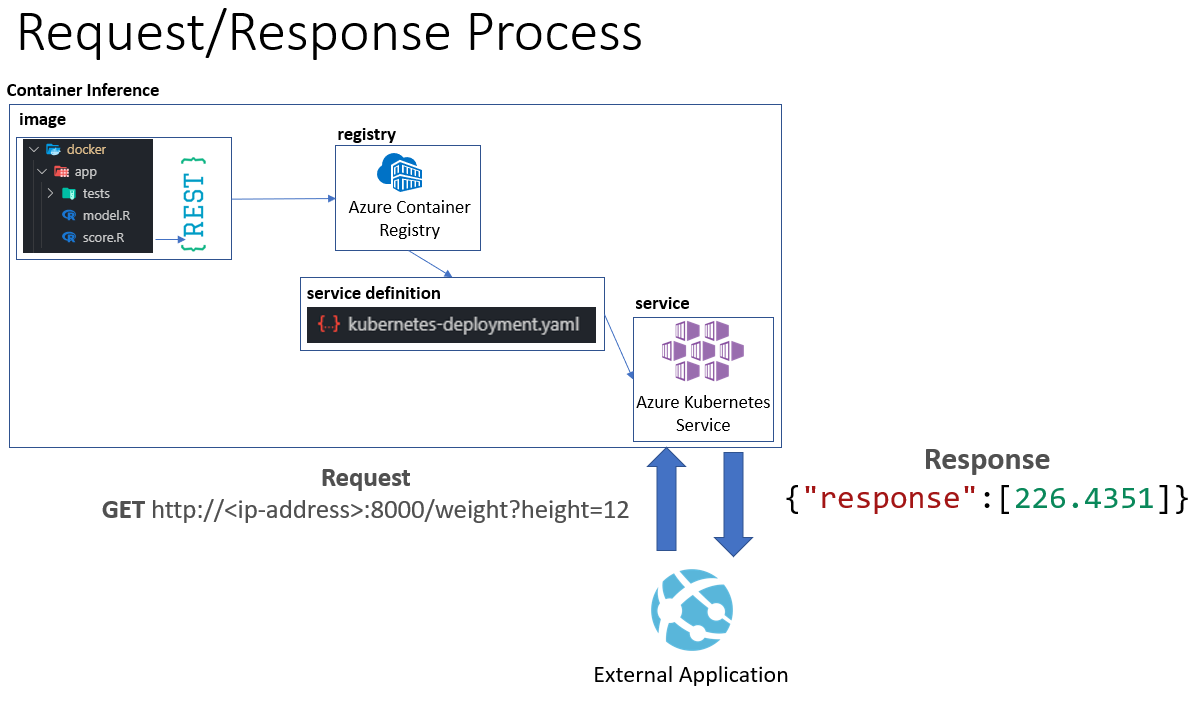
The diagram above shows the basic flow from creating the docker image, registering it and then exposing it as a service on Azure Kubernetes Service. Our goal is to have a deployed web service that any application can leverage to get a predicted weight (y) for a given height value (x). The application will only have to perform a GET request against a http endpoint, the other components such as the image, registry, service definition etc. are abstracted away from the external application perspective.
Flow:
- Image - we need to create a docker image which contains all the code and libraries we need to execute our model inference.
- Registry - Once we have an image created, we need a secure location to store and version the images that is accessible by our CI/CD pipeline.
- Service Definition - References the image stored in the repository, along with other configuration parameters necessary to expose a docker image as a service on a Kubernetes cluster.
- Service - Azure Kubernetes Service. This service will run our container image and exposing the web service. It will also handle tasks such as high availability, hosting, routing, etc.
First, we’ll start with reviewing the inference scripts.
R Scripts - Inference
We’ll need two .R scripts to build our web service:
- model.R
- This script will contain a function to load the serialized model into memory, along with a function that performs the prediction using the model and returns a response. This of this as the “inner” script which we need to source.
- score.R
- This script will contain logic necessary to use Plumber to expose the prediction function in the model.R script as a web service and load the serialized model.
model.R - base functions
This script is very simple, there are only two functions.
load_model(): This function takes in a string argument called path and loads a .rds file from that path in storage into a returned object called model.
predict_weight(): This function takes in an integer height value, along with a model object. It uses the model object to predict a y value based on the given height, and then formats and returns a response as a list. Here is an example output:
{
    "response": [
        226.4351
    ]
}
score.R - REST wrapper
I would encourage you to read the Plumber documentation found at https://www.rplumber.io/. In short, Plumber allows you to easily make REST APIs from your R functions.
In our model.R file, we simply need to:
- Source the model.R file to get access to the functions we defined.
- Load the model into memory
- Define a function with appropriate Plumber decorators which will expose our predict_weight() function as a web service.
# Load functions from "Model.R" file to be used in WS
print(paste("Working Directory: ",getwd(),sep=""))
source("/app/model.R")

# Load Model
model <- load_model("/app/model.rds")
print(model)

#* Predict weight based on height
#* @param height the user height
#* @get /weight
function(height=0){
  predict_weight(height,model)
}
The code above will expose the predict_weight() function on the /weight endpoint on the host and port wherever the script is running. You may notice that we do not reference or load the plumber library at all via a standard library() method. This is because the container image we plan to use as a base image already takes care of that for us. We’ll discuss creating the image in the next part of the series.
R Scripts - Testing
We have tests created in our /docker/app/tests/ directory in our repository. Similar to the batch/Databricks deployment, we will use the testthat library for our tests. There are two files in this directory:
- tests_1.r
- Contains our sample test cases. Each test case is implemented in a function.
- We set a testing context that will display in the test results.
- We need to ensure that we source the model.R file that contains the functions we are testing.
- 0_run.r
- Contains wrapper code for executing the tests.
- The package needs to ensure that the xml2 and testthat packages are installed on the host before the script executes, because they may not be included in the base image we use.
- The script sources the directory where the tests are located. The test_dir() function in the testthat library looks for files with “test” in the filename.
- We also need to specify a JUnit formatted test output file, so that results can be read into Azure DevOps.
You can look at the actual code in the GitHub repo, but I wanted to point out the main points of each script above.
Conclusion
Congrats. Now, we have all the code needed to expose our inference script as a web service, and we have tests associated with our inference script. In Part 7, we will explore how to build a docker container with all of this configured which we can eventually deploy as a service on Azure.
- Getting Started
- Deployment Option 1 - Batch Processing
- Deployment Option 2 - Request/Response
- Part 6 - Creating Request/Response Web Service for R Model
- Part 7 - Containerizing R Web Service
- Part 8 - CI for Container Deployment
- Part 9 - CD for Container Deployment