
R Model Operationalization on Azure - Part 7
Welcome to Part 7 of the series, where we will talk about creating the container image for our R model inference code. In the previous section, we created all the necessary scripts for inference with our model.rds file, along with supporting tests.
If you’re unfamiliar with Docker, I would suggest reading the Get started section of the Docker documentation, along with the Dockerfile reference page.
For this section, we’ll be covering the following topics:
- Directory Structure
- Dockerfile + Base Image
- Local Testing
- Kubernetes Service YAML
Directory Structure
Remember, in this repository we have files related to many different services. Our solution is comprised of multiple services, which all have different file types and directory structures. We’ve stored all files related to containerization into the /docker directory of our repository. Separating the repository in this way makes it easier to keep track of what files belong to which service, it also enables to make great use of path filters in our CI/CD pipelines.
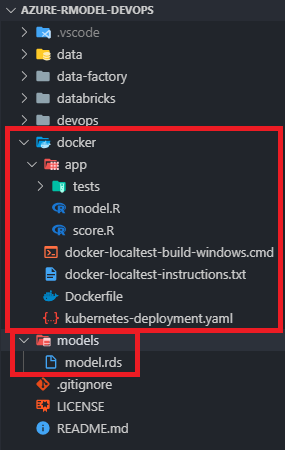
A few notes on the image above:
- In general, the /docker directory contains all the files we need to build our container. everything inside the /docker/app folder will actually be copied into the container image, while everything residing in /docker/* (besides the /app folder) is used in some capacity to define the container image or service.
- docker-localtest-build-windows.cmd and docker-localtest-instructions.txt are both files meant to assist with building the container image locally on your dev machine, for Windows machines. These are only necessary if you’re interested in testing the container locally. For our CI/CD pipeline, we will be building the image from the master branch of our repo on the build agent.
- Dockerfile and kubernetes-deployment.yaml will be explained in detailed later in this section.
- The serialized model.rds file is located in /model in the repo. This file is a shared resource between the Databricks and container deployment options and we want to manage a single version in the repo. When building the container, we will have to copy it from /models to /docker/app so that it is included in the image.
Dockerfile + Base Image
In short, the Dockerfile (repo link) defines how our image is built. let’s go through a quick walkthrough of the steps taking place in our Dockerfile.
FROM trestletech/plumber
# https://www.rplumber.io/docs/hosting.html#docker

# Copy files from /app in local to /app in the container
ADD /app/ /app/

# Add requirements for testing package
RUN apt-get install -y -q libxml2-dev
RUN mkdir /app/test-result

EXPOSE 8000
CMD ["/app/score.R"]
The first line defines our base image. We’ll be using the trestletech/plumber base image for our containerized service because it already has Plumber installed and configured to execute a target script. All we have to do is point the image to our target script, and our score.R file which contains the Plumber decorators will run as a web service, cool stuff.
The next step ensures that we copy all files from the /docker/app path into the /app path INSIDE the container. Since the serialized model.rds file is not inside the /docker/app folder in our repo, we need a preceding step to copy it to /docker/app if testing locally, or when building on an agent host.
The testthat library requires libxml2-dev to be installed, so we make sure that’s installed on the image. We also want to create the directory where our JUnit formatted .xml test results file will be written to.
After that, we define what port we want the web service to run on, and tell the container to execute /app/score.R, which is our inference script.
That’s it, only twelve lines, with comments and spacing!
Local Testing
If you want to test your container locally on a Windows machine, I have a script set up to do that. If you’re on OSX or Linux, you can read the instructions and you’ll just have to change the commands for copying and deleting the model.rds file. You will also need to have Docker installed on your machine, you can get it from the Docker website here. You can use a web browser or the POSTMAN tool to test the REST API.
##########
Local Build/Test - Windows
##########
To build this docker container locally, you can perform the following:
1) Open Command Prompt
2) Change directory to this current directory where the Dockerfile resides (/azure-rmodel-devops/docker)
3) Run the following script to build the container locally (on windows):
docker-localtest-build-windows.cmd
4) Run the following command to run the container locally:
docker run -p 8000:8000 --name azure-rmodel-devops azure-rmodel-devops:latest
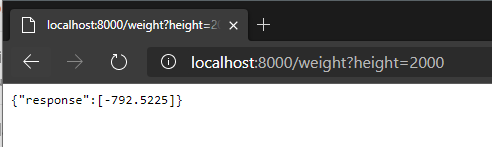
5) Perform a HTTP GET against the local endpoint to test (Can do this in browser or via POSTMAN):
http://localhost:8000/weight?height=2000
6) Response from the endpoint will be in the following format:
{
"response": [
-792.5225
]
}
In step 3, you are basically calling a script I made that wraps the docker build command with copying the necessary model.rds file to the /docker/app folder, and deleting it after the build. Note that ‘rem’ is a comment in batch files:
rem Copy the model from the model directory to the /docker/app folder
copy "..\models\model.rds" ".\app"

rem build the docker container
docker build -t azure-rmodel-devops .

rem Delete the model.rds file from the local /docker/app directory
rem We don't want a copy of our model file to be source controlled in another directory.
del ".\app\model.rds"
If you have issues running the docker commands, you can refer to the Docker documentation or the CLI help options. If the container is running properly, you should see the following result when testing locally:
Kubernetes Service YAML
The kubernetes-deployment.yaml file defines a deployment for our Kubernetes environment. We need to parameterize this file in a similar manner to what was done for the Databricks job definition file earlier in the series. We have parameters for:
- #{service-name}# : this will be the name of our service. In our CI/CD pipelines, we’ll replace this with the name of our repo, azure-rmodel-devops.
- #{acr-name}# : this will be the name of our Azure Container Registry service.
- #{BUILDID}# : this will be the build id from Azure DevOps, we will use this as the image tag.
During our build pipeline, these values will be replaced with real values from pipeline variables.
Conclusion
At this step in the process, we now have all the files needed to create a docker image for inference with our model, along with tests and a service definition for a Kubernetes deployment. In the next section, we will see how we can execute the container unit tests from a build agent and display the test results in our pipeline. Part 8 focuses on the build process in Azure DevOps for our container.
- Getting Started
- Deployment Option 1 - Batch Processing
- Deployment Option 2 - Request/Response
- Part 6 - Creating Request/Response Web Service for R Model
- Part 7 - Containerizing R Web Service
- Part 8 - CI for Container Deployment
- Part 9 - CD for Container Deployment